Friday, June 28, 2013

Weekend Inspiration: 4th of July

I asked my Mom yesterday what I should use as a theme for Weekend Inspiration. Her answer: "Well the 4th of July is Thursday so..."

"WHAT? That's the next week."

"Nope. It's in 7 days."

"I refuse to accept that."

Seeing as the calendar doesn't care about my refusal, I guess I better find some great stuff to celebrate Independence Day!


I love that this banner isn't the usual stars and stripes but just as patriotic. From the Shabby Scrapper on Etsy.


Chocolate dipped frozen popsicles from Just a Taste would be the perfect treat. 

This recipe from Whipperberry uses Jell-o to make multi-colored popcorn. I'm curious to try it.

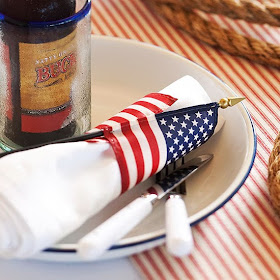
Such a simple idea from BHG to use little flags as napkin rings. Then everyone gets a napkin AND a flag to wave during fireworks. 

Is there any dessert with a better ease-to-taste ratio than Rice Krispies Treats? Nope. And the color added by Lil' Luna makes them extra special. 


First, we can all admire the silly face on the kiddo in the corner. Second, this wreath from Tell It To Your Neighbor is made out of paper cups! So neat! 


 What a fun idea for a pie crust from Cosmo Cookie


This tutorial from Whimsical Whimsies looks pretty easy and would make a perfect party decoration.


4th of July citronella candles from Alpha Mom. Decorate AND keep the bugs away from the outdoor festivities.

Hope you have a great weekend! Any fun plans in the works? I'd love to know!

Sheila :)


Thursday, June 27, 2013

Honesty Alert: Dumb Days

Do you ever have days when you feel like everything you do is wrong?


I’m having one of those days today. I accidently said something that could be hurtful and didn’t realize it until way later. So much later that I hate to bring it up again and revive awkwardness. I’m spilling things and making messes all over the place. I’m running into clearly established pieces of furniture. I’m not going a good job focusing.

So I stopped. I took a minute to go for a short walk. I made a fresh pot of coffee. This is my attempt to “restart.” I know I’m not dumb. I know my co-workers don’t think that. I’m just doing silly things and I need to move on.

It’s okay that that happens. Otherwise, how would I understand when someone else is having the same type of day? I need to remember to give myself the same patience and forgiveness I would give to others. Also, it’s almost insulting to not assume those around me are forgiving people. Oops. 

Let’s just all agree that dumb days happen. And we’re allowed to forgive ourselves. Let’s just restart, shall we?

How do you turn your day around when it’s headed down to frustration town?  I’d love to know.

Sheila

PS. The look on my little friend’s face is exactly how I feel right now but it’s much cuter on her. After two years, I still miss working with kids.  Also, being able to wear a scarf to work to hide unwashed hair. I miss that too.

P.S.S. Is dumb an offensive term? Didn't think about it until I was getting ready to post. What do you think? Hope not!! There I go again...

Wednesday, June 26, 2013

Crochet Basics for Lefties

Aaannndddddd with this one post I'm excluding 90% of the population. Sorry y'all.  You might still enjoy the preview at the bottom of some coming patterns.

I first started knitting in 6th grade, I believe. I learned from my right-handed Mom, so I knit right-handed. I only learned to crochet about 2 years ago when I first moved to Montana from a friend who just happened to be left-handed. I WAY prefer crocheting over knitting. It's so much faster and, in my opinion, easier. There are plenty of crochet tutorials out there but way less for us southpaws. You're doing the exact same thing but it can be confusing to see it the opposite direction. If you're a cynical righty and don't believe me, just look below and see if it confuses you at all.

I'm starting from the very basics. Please, please, please feel free to comment and ask any questions or make any suggestions for clarity.  Also, these are the American terms. The European stitches are different. Always make sure to check your pattern, just in case.

Here are some terms that will make learning the stitches a lot easier. First, the hook. This metal one was about $2 from Joann's and it's the one I use most frequently. I recommend size I, or 5.5 if you're getting one hook to start with. The tail is the end of the yarn which usually is just weaved in to the work. The working yarn is the part still connected to the source that's doing all the work, basically. Any time you have to "yarn over," you'll want to have the yarn resting across the front of the hook (pics below). You don't need to wrap it all the way around as some beginners tend to do. It is easiest if you hold the working yarn taught with your right hand so you can use the hook in your left hand to pick up the yarn, instead of wrapping. It goes much faster that way. Learning how to hold your hook and yarn takes practice and can be a little different for everyone.  Need a video? Let me know! 

Slip Knot 


Loop the tail over the working yarn (1). Pull the working yarn through the center (2). Insert hook (3). Tighten the working yarn gently until the knot fits the hook (4). This is how you will start almost all crochet projects. See how easy that was?

Chain Stitch or Foundation Stitch (ch)


The chain stitch it the EASIEST stitch. With the hook through the slip knot, yarn over (1). Pull the hook back through the slip knot with your yarn you just picked up (2). That's it! See how they form a chain (3)? 

Single Crochet (sc)


Now we're ready to start building on to our chain. As you can see, there are two parallel section of yarn at the top of each stitch in the chain and another piece on the bottom. Insert the hook through the top 2 pieces (1). Once the hook is through, yarn over (2) and pull it back through. You will have 2 loops on your hook (3-sorry the working yarn made this hard to tell!). Yarn over again and pull through both loops to complete the stitch (4). See how they look in a row(5)? 

Double Crochet (dc)


A double crochet starts with yarn over (1) BEFORE you put your hook through anything. After the yarn over, go through the top of a stitch the same as you would a single crochet. Yarn over (2). When you pull your hook back through, you should have 3 loops on it (3). Yarn over and pull through the first 2 loops only, leaving you with two loops left on your hook- the original loop, and the yarn over you just pulled through (4). Yarn over again and pull through the last 2 loops to get back down to 1 loop (5). It sounds like a lot of steps, but once you get the hang of it this stitch goes very quickly. It's the most common stitch used in patterns. Check out the difference between single crochet and double crochet when they're right next to each other (6). 

Now get to practicing! There will be many simple projects and easy patterns coming in the days ahead. Here's a small preview of things yet to come:


Are you left-handed? Are you interested in crocheting at all?? I'd love to know!

Sheila

P.S. If you're already a crocheter, you should definitely be following My Rose Valley. I love everything Annette makes and her pictures are always gorgeous!


Tuesday, June 25, 2013

Almond Butter Chocolate Chip Cookies

There are few things more delicious than cookies made for no reason at all. 

Last week, a friend from work asked if I could use up an almost full tub of almond butter in one weekend since the expiration date was that Monday. Um, challenge accepted. 

My favorite chocolate chip cookie recipe is one my Mom clipped out of a newspaper forever and a day ago.I have no idea what it's called or who actually came up with it. Sorry. The best part about it is that it calls for 1 cup of peanut butter. Having regular chocolate chip cookies with no peanut better tastes weird to me now. I've been spoiled! Substituting the peanut butter with almond butter seemed like a delicious alternative, and somehow made the cookies seem more grown up. To match the adult(ish) switch to almond butter, I decided to use dark chocolate instead of the usual semi-sweet (so basically they're healthy now) and toffee bits (shhh... just let me believe they're healthy). 

You will need:

1 cup granulated sugar
1 cup brown sugar
2 cups all purpose flour 
1 tsp baking soda
1 cup almond butter
2 eggs
1 cup soft butter 
2 cups mix-in of choice (used here are dark chocolate and toffee bits)

Preheat oven to 350. Cream together sugars, butter, and almond butter. Mix in eggs. Add combined flour and baking soda. 

Use a spoon to combine the mix-ins. It seemed like fun to experiment: the far left is just dark chocolate, the center is dark chocolate and toffee, the right is just toffee. Really, there was no way to loose.

Make fun of your friend a little for the large size of her cookie balls. Roll your own in 1 inch balls and place about 2 inches apart. Bake at 350 for 10-12 minutes. 14-15 minutes for those more enthusiastically sized.

Leave them on the sheet a few minutes to firm up. If you move them while they are too hot they will fall apart, which is part of what makes them so delicious. Put them on a wire rack or paper towels to finish cooling.

Eat too many, force your friend to take some home, then bring them to work the next day because you don't need a massive plate of delicious cookies all by yourself.


Is there anything different about your favorite chocolate chip cookie recipe? What other mix-ins would you want to try? I'd love to know.

Sheila

P.S. The one with both chocolate and toffee was my favorite, in case you're wondering. Although all 3 options were enjoyed.


Friday, June 21, 2013

Weekend Inspiration: Kites

Welcome summer! Thanks for the gift of this beautiful, breezy morning. Nothing could be finer than to be in Carolina in the mooooorrrnin'. (10 points if you get that reference.) I'm looking forward to all the great things about summer. Beaches, road trips, picnics, and so much more. When I worked with kids in an afterschool/summer camp program a few years ago, the first day of summer we decided to make kites as a class. The kids were very careful to decorate them so they could be recognized from high in the air. I don't think I've ever laughed so hard as when I watching those determined little ones get their lovingly homemade kites in the air. It went a little something like this:

So now I associate kites with the beginning of summer. And hilarious cuteness. Without further ado here is Weekend Inspiration: Kites!


You could make a normal kite. Or your could make this OWL kite from Red Ted Art.


I found this simple, happy cake on Sabores da Gula. The blog is in Portuguese but fortunately great pictures and work is universal. 


Wouldn't you love to get this handmade card from Lime Doodle Design in the mail? 


Find out how to make these cookies, and a big impression, on the Sweet Adventures of Sugarbelle.


The detail of the floating kits tails on these cupcake toppers makes them. From the Etsy shop DD Cupcake Accessories.


A kite door hanger on Polka Dot Pavilion; welcome summer and guests simultaneously.


Kite gift tags from the Etsy shop Raemj. The perfect thing for a summer party. 


I would wear these simple kite studs from Studio Cosette on Etsy all summer.


Would it be weird to have this bunting from Juneberry Lane up all year? 'Cause I kind of want to.

Isn't it wonderful that the first day of summer just happens to be a Friday!? I hope you have some fun plans for the weekend.

Sheila :)

Thursday, June 20, 2013

Honesty Alert: Stigma

Opinions are like noses. Everyone's got one, but some are prettier than others.


The past 2 years I have had the blessing of working with multiple non-profit organizations through various capacities. As a VISTA, my primary goal is to combat poverty in it's many manifestations. Last year, it was domestic violence, an issue not confined to families in poverty but stressers such unemployment and economic hardship have been shown to be triggers. This year, as a VISTA Leader in a nationwide non-profit with many community partners, I've seen many, many different service fields and challenges. Hunger, homelessness, mental illness, physical illness, weight issues, addiction, lack of affordable housing, lack of insurance, lack of education... SO MANY.  Do you know what I've found to be the most common struggle in all of these things? Stigma.

People don't want to tell anyone they're being abused because there's a stigma. People don't want to reach out for help to feed their families because there is a stigma. People won't reveal that they are struggling with addiction or depression. Why? Stigma.

That darn stigma is a tricky thing. Essentially, when we refuse assistance or support in order to avoid a stigma we are saying we are more concerned with another's perception of our well being then we are with actual well-being. We're worried others will think we are lazy, or poor, or whiny, or stupid, or diseased, or any other number of undesirable adjectives. You know what these challenges really say? We are human.

It makes us fell better when we hear of someone who's situation is worse than our own. We think "At least I don't have to do that." or "I would never get that desperate." I'm guilty of consoling myself that way. I don't mean to say we are not entitled to a healthy dose of personal privacy or that we need to share all of the grizzly details with everyone in order to embrace them. Please, feel free to keep your private life private. I can be a terrible listener sometimes. On accident. Especially if a game show is on in the background. BUT I am encouraging you; don't let the conceptions of others be what that prevents you from  getting the assistance you need to rise above whatever circumstance is plaguing you. Avoid self-stigmatizing and holding yourself to a standard others wouldn't even force on you. I have my struggles. I'm sure you have yours. I have things that I'm ashamed of. I would assume you have those as well. But giving power to a stigma is like... it's like... I don't have a metaphor, okay, it's just a bad idea.

Again, I am not at all qualified to give you the care you need in any of these circumstances or others you may be struggling with, but know that I don't judge you for it, regardless.  And I'm positive people who are able to assist won't judge you for it either. If they do, sucks for them 'cause I'm pretty sure you're an awesome person.

One day, you could be the person in the position to lend a hand. Without a stigma.

Sheila :)

PS. Art by Rhonda Johansen. Text added. 

Wednesday, June 19, 2013

Plastic Bag Doormat (Work in Progress)

Sometimes, projects take longer than I expect.

For example, this is a doormat I've been working on made out of plastic bags. The first night I worked on it, I got is about 1/3 of the way finished. The next time I touched it I hardly made a difference. It's still sitting on the floor of my bedroom, staring at me. Mocking me with it's little plastic bag voice "Feeling lazy Sheila? We'll wait." Joke is on you, mean doormat, I'm going to post about you anyway.

This project is not at all difficult, but it is time consuming. When it's finished, we will have an easy to clean, waterproof doormat on our front porch. And it was freeeeeeeee.

You will need

-Plastic bags, I used around 60. 
-scissors
-rubberband
-Thick needle and thread

*60 sounds like a lot of bags but we had that lying around the apartment easily.  It's especially easy if you don't care if your bags are all the same color. Clearly, I don't. It's also helpful to have a roommate who supports your recycling hoarding habits. 

Start by cutting your bags into strips. For this project,  it's best to cut a few bags at a time and go back in sections. It's easy for the plastic to become tangled or unruly if you try to do too much at once. To cut the bag, flatten the sides in and remove the thin strip with the bottom seam and the handles. Cut the rest of the bag down the center long-wise to create 2 long circled strips. 

 Loop the circles together and tighten. 

The best compromise as far as tangle-free and not stopping every 5 minutes to cut more bags was to cut 3 bags and loop them all together at a time, for a "strand" that was 6 loops long. You will need 3 of these strands at a time; 9 bags for each section of braid. Start the braid by tying the ends together with a rubberband. 

It's easiest to braid if you have something to pull against, so I used the rubberband to attach the ends to the top of a chair. A door knob would work well too. An even, medium tension braid looked the best.

When you reach the ends of the strands, loop together a few more bags and add them to the end. I used about 20 bags in each strand for a total of 60 bags. I also moved the knot on my chair as I added bags so I didn't have to keep walking backwards around the apartment. Coiling the braided bags as you go makes it easier to see how much more you will need.

Once you've finished the braiding, you're ready for the tedious part: sewing. The bag cutting and braiding goes pretty quickly. It took maybe 2 hours (or the length of "You've Got Mail") from cutting the first bag to finishing the braid. The sewing is what is taking me forever. If you don't want to put it outside, you can probably get away with hot gluing it. But no cutting corners here!


I wanted my braid to lie flat so it would be a little wider and more flexible. I removed the rubber band from the end and started sewing by running a few quick stitches at the end to keep it held together. Working from the center around, the best way to keep stitches relatively unnoticeable is to run your needle between the strands (center to center) instead of through the plastic. It also requires less effort. Phew! 


Can you see the stitches? Granted, they're only in a few inches in the center so far...


Maybe now that the internet world knows about it, I'll be more motivated to finish. Especially since it will look so cute with all of Amanda's plants on the porch. I promise to give an update of the finished project.

Do you have the patience for a project like this? Or would you have to put it down and come back from time to time, like me? I'd love to know.

Sheila

Tuesday, June 18, 2013

Chocolate-Dipped Watermelon Cookies

Why stop at just a fruit bouquet when you can make fruit "cookies"?


How about chocolate dipped watermelon cookies? Whole Foods had watermelon on sale the other day so I picked one up. At the time I didn't have any specific plans for it. Later I remembered I needed a dessert this week...brain storming...mental pantry inventory... Does chocolate taste good with watermelon?...


Yes my friends, yes it does.


You will need:

Seedless Watermelon
Cookie Cutter
16 oz Chocolate Chips, I used dark chocolate and semi-sweet mixed
small chuck of paraffin wax, 1/8th of the bar would be almost too much
toppings such as coconut, sea salt, etc.

*I've heard that coconut oil is able to function in the same way as paraffin wax; it should help the chocolate to grab on to the fruit and become slightly hardened when cooled. I haven't tried it but I want to!

Start by heating up your chocolate so it has time to melt slowly. You can do this in a double boiler on over low-medium heat, or use a mini-crock pot with a warm setting. Keep an eye on your chocolate and stir occasionally throughout the following steps.


Slice your watermelon in pieces about as thick as your chosen cookie cutter. In this case, about 3/4".


Use the cookie cutter to create small cookie shapes from the slices quickly and easily. I used a flower cookies cutter. A smaller cookie cutter seemed like it would be easier to dip in the chocolate.


Honestly, the cookie cutter could be your only step and it would still be an adorable way to eat watermelon. But if you're in it for the chocolate long haul, mix the small piece of paraffin wax with the mostly melted chocolate. Stir until the piece is gone. You can use a serving fork to pick up each cookie and dip one flat side into the melted chocolate.


Place the dipped watermelon chocolate side up on a piece of wax paper and sprinkle on your chosen topping before the chocolate hardens. I used coconut and sea salt as topping choices, and left others undipped or just chocolate.


It was fun to alternate the finished products on a cookie sheet. The sea salt was definitely my favorite.


You don't need to refridgerate or freeze to harden the chocolate, but I would recommend refrigerating if you're waiting to serve them. Otherwise, just enjoy! Overhead lighting makes them look super shiny.


These weren't happy when they were outside for a while, but they regained their composure when taken out of the heat. If you make them for a cookout, I would keep them inside or refrigerated until it's time to serve rather than leaving them out on the table.

Have you ever had chocolate and watermelon before? What topping would you like to try? I'd love to know!

Sheila :)