Showing posts with label DIY. Show all posts

Tuesday, May 27, 2014

Hanging Herb Garden (The Easiest One)

Things have pretty temperate here in Greenville lately. Not too hot or rainy and just a little breezy. The long sunny days have encouraged keeping the curtains open as much as possible to let in the natural light. I noticed something that made me a little nervous: the sun was never reaching my herb plants. Obviously, that led to an instant panic that the plant babies were going to die any minute from a lack of sun. Something had to be done.


Macrame and I are old friends going back to the days of summer camp and friendship bracelets. I've seen all kinds of hanging planters on the interwebs and decided it shouldn't be too hard to combine the old skill and the "new" trend. I've been pleased with the outcome since the herbs seem to be much happier and the colorful hanging pots are more fun to see. Because each hanger involves so many steps, I'm splitting them into 3 posts to keep them from getting overwhelming. This first one using 4 strands took about 10 minutes to make.


You will need:

Small Pot filled with the sun-craving plants of your choice
4 pieces Nylon rope, 72" each
1" Steel welded O-ring (can be bought individually in store for 80 cents)
Lighter (optional)

I chose these pots from Lowe's for a few reasons. 1, they were adorable and cheap (that alone would be enough honestly). Second, they were light-weight plastic so they wouldn't weight down the rope or the hooks too much and the sun shouldn't be too drying or damaging. These pots are also "self-watering" which means the pots don't drain on the patio below and it should help protect them from drying out with the dramatic increase in sun. Lastly, I was already there and didn't feel like shopping around anymore. So there's that.

4 Strand Hanging Planter

It was originally hard to see the detail in the pictures with the white rope so I used different colored yarn instead. Also, there were no rings left so I used the ring from a plastic bottle. Because I'm classy.

The first step is to gather all the strands and feed them through the ring. Once the ring is at the center of the strands, you'll tie what I like to call a "pretzel knot." Warning: do not use that term in front of people who know what they are doing/care about technical terms or they will laugh at you. The pretzel knot is the only one you'll use for this whole planter. Just cross the strands over each other and pull through the center. It helps to pull each individual strand as tightly as possible after tightening up towards the ring.

There's now 8 strands that are a little less than 36 " long. About 10" down, tie pretzel knots in pairs. 5" from there tie pretzel knots again, being sure to split the strands that were just tied together and join them with their immediate neighbors (see why the colors made this so much easier to explain?). Lastly, 3" down tie another pretzel knot using all strands and tighten. Finish it off by trimming the ends and using your lighter to melt the tips to keep the rope from unraveling. That's it! Seriously, 10 minutes tops.


The planter is pretty short. Finished it's only about 20" long, which was perfect for what I wanted but you may want to make your ropes longer that 72" to start with if you're looking for something more. They're so quick to make you can experiment. Keep an eye out this week if you're interested in the others which will be titled "The Ever-So-Slightly More Complicated One", and then "The Unexpectedly Challenging One."

Do you think macrame hangers are back in style? Do you know the real name for the pretzel knot? I'd love to know!

Sheila

Tuesday, March 18, 2014

"Iron" Headboard (trickery)

Is there anything better than the feeling of making something yourself for SUPER cheap, and having people think it was store bought and expensive? Nope. Not to me anyway. Especially when it's something that completely changes a room. A perfect example of this type of project was a PVC headboard that looks like iron. #fooledyou


This bed frame and headboard set from Urban Outfitters is $800. My bed frame and headboard set was about $50. And $35 of that was spent on the plain metal sturdy frame. Enough with the numbers, the other great part is how relatively simple it was to make!

You Will Need:
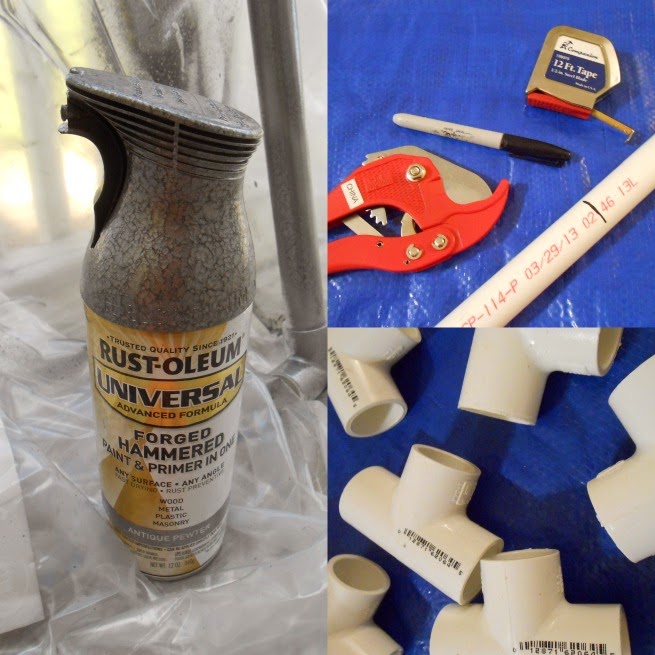
4- 10' PVC pipe poles 3/4" thick
2- PVC elbow joints for 3/4"
14- PVC t-joints for 3/4"
PVC pipe cutters
Measuring Tape
Sharpie
Spray Paint
Plastic sheeting or area okay to paint it

My dimensions are for a queen size bed but it would be easy enough to adjust the width as needed. Mark off your measurements with a sharpie and use the pipe cutters to cut to length. Here's a list of cuts:

1 piece- 60"
2 pieces-6"
2 pieces- 18"
6 pieces- 24"
10 pieces-11.5"


I know 11.5" is kind of a weird measurement but using the t-joints adds a tiny bit of length. Using a full 12" would make the detailed section too long for the top bar and too wide for the bed. Push all the pieces firmly together. You can use a rubber mallet if you're having trouble getting them as tightly as possible. After this picture, I added t-joints to the bottom pipes too.


To paint, I used Rust-oleum in hammered finished antique pewter. It has a primer in it and is also suitable for plastic. Give it all 2 coats and a day to try between each one.I just happened to have these large sheets of plastic still around from when I bought my mattress. They were perfect to guard the background from rogue spray paint. Be sure to wear some kind of shoes though - the bottoms of my feet were antique pewter for a week, Ikidyounot.


After it dries thoroughly just put it behind your bed. I haven't attached it in any way, just let it rest between the bed and the wall in the corner and it's fine. I wouldn't lean on it myself but it's perfect for pillows and looks cute with a blanket over the top rail as well.

Can you tell it's made of $10 worth of PVC and a good can of spray paint? What color would look best in your room? I'd love to know!

Sheila

Wednesday, November 13, 2013

Beaded Badge Holder Necklace

My friend Nicole and I served as VISTAs together in Montana 2 years ago. Since then, we both moved on to new professions in new areas but it's still fun to support each other whenever the opportunity arises. When she first started her current job, she decided to fancy up the mandatory I.D. badge with a project I'm sure many people could use. She was kind enough to share her process:

So, I recently started a job in a secure building that requires me to wear an I.D. badge at all times. I got this horrible badge chain the solid black and my picture never faces the right way, no matter how many times I try to change it.

For this project I started with some basic tools.

Needle Nose Pliers with a side cutter
Beadalon bead stringing wire in satin silver and .46mm
Beadalon crimp beads size #1 in silver
Beadalon swivel badge clip
Barrel clasp in silver (not pictured)

(Beadalon did not sponsor this post, I just happen to use the brand most often)

I selected very small purple beads and two shades of purple and one shade of teal that were just a little bit bigger.


I started out by laying my beads out on my beadboard. You don't have to use a beadboard, it just helps to see it laid out. My pattern: 10 very small purple beads, 1 of each shade of the small purple, and a teal. I repeated it about 2-3 times around my board. I measured out my wire by wrapping it around my neck and making it a little longer than I wanted it to be when finished.

This is what it looked like near the end:


Once you've got the beads on to the length that you want your chain to be it's time for the tricky part. Finishing it.

I finished mine by looping the end of my string and sliding a crimp bead over it. Keep the loop big enough to fit your clasp. Crimp your bead with the pliers and your loop will stay in place. Do this with both sides.

Once you're done with that simply loosen the hooks on each side of your barrel clasp and connect each side to your loops. Pry them closed with your pliers the necklace portion is done!

It should look something like this:


To place my badge clip on I unhooked my clasp and slid it on.

Finished product:


Nicole stepped slightly outside of her comfort zone to share the project, but she's no stranger to the internet world. Check out more of her writings on her tumblr teenagebookland.tumblr.com where she reviews and shares about her favorite books. Thanks so much Nicole! 

Tuesday, September 3, 2013

Make Your Own Crayons

How wonderful was your Labor Day? I'm going to go ahead and assume. Pretty wonderful. My Mom came to visit me to explore Greenville and help me get my new place a little more put together. We accomplished a ton and somehow it seemed to create all the more work. 


It made me think of when I was home just a few short weeks ago and helping Mom prepare for the start of the school year with her new Kindergarten class. We just happened to take pictures of that adventure if you care to make your own crayons, for a classroom or yourself.


You Will Need:
-Lots of crayons, old ones that are broken or unused are the best kind. Also, Crayola seems to melt the nicest.
-Molds, either candy molds or fun ice trays
-Empty clean soda cans


Start by peeling the old crayons using a knife down the wrapper. It's best to sort them by color while you're peeling them. It's fine to have a pretty broad spectrum of the same color but if you mix too many outside colors with this method the final color can turn out a little brown-ish. Break the crayons into smaller pieces.


After you're finished peeling and snapping crayons (which is oddly satisfying), fit as many crayons as possible into a soda can. Make sure the can is as full as possible or it will want to tip over when you place into a small pot of boiling water. This little hack makes what is essentially a disposable double boiler. Later as the crayons in the can start melting you can add any crayons that didn't fit into the can on the first go. It takes about 10 minutes or so to get the wax nice and melted. Make sure to use a pan that is not your favorite in case you accidentally get a little wax in there; it's not the easiest thing to wash off.


Mom collects blue apples and they are a part of her classroom theme so the blue apple crayons seemed like a perfect welcome gift for the new kindergartners. Once the wax melts, pour the contents of the can slowly into your chosen molds. Mom used an oven mitt at first but then decided the can wasn't actually that hot and just used her bare hands. I was too much of a pansy to touch it. I don't have that magic force field yet that moms get around their hands to protect from heat, etc.  The wax in the molds may start to dent slightly in the middle. That shouldn't matter, but if it bothers you pour in a tiny bit more wax to fill it. Put the molds in the freezer for about 20 minutes to let the wax harden.


Pop 'em out and you're done! If you get any spill over, it's best to let it harden and then gently trim it with scissors after the crayon has been removed from the mold. You can reuse the same can over and over for the same color. You probably shouldn't use whatever mold you used to make the crayons to hold food again...

We did this all the time when my sister and I were younger--Mom knows all the fun activity secrets. Have you ever made crayons before? Any other tried and true methods to share? I'd love to know!

Sheila

Monday, August 26, 2013

DIY Paper Towel Holder

Happy Monday! I hope your weekend was as lovely as mine. I spent lots of time getting things unpacked and watching some of my favorite movies at the same time. I've stayed a list of all the projects I want to make in the next few weeks. This little guy was at the top of my list since I expected it to be pretty easy. Surprisingly, it worked out just the way I planned. 


I love the way the paper towel holder turned out. It matches my kitchen perfectly, looks cute, and was at least $5 cheaper to make than it would have been to buy a brand new one thanks to coupons and sales.


You will need:
2 pre-cut wooden dowels, 1/2" diameter and 12" long
2 decorative knobs with the screws attached to the base (make sure they are small enough for a roll of paper towels to fit over)
2 wood screws, 1" to 1-1/2"
1 precut circle plaque, mine was 6" across
Drill
Wood bit to pre-drill
Normal bit that fits your wood screws


Start by pre-drilling the center of one end of the dowels. It was surprisingly easy to keep the drill straight while doing this. Drill in as far as the bit will allow so you can make sure there is enough space to screw in the knobs all the way.


Once the holes are pre-drilled, hand tighten the knobs into the holes. Also, make sure the knobs you pick are small enough that a paper towel roll can fit around it so you don't have to unscrew it every time you need a new role.


Next, mark out where you want the holder dowel to sit on the circle plaque and where you want the sheet stopper dowel to go. I used a new roll of paper towels to help me figure this out. Pre-drill those holes as well.


Carefully hold the dowel up to the plaque, doing your best to keep it sitting straight. Its very easy for the dowels to become crooked. Drill through the bottom of the plaque into the dowel tight enough that the screw sits flush on the bottom. Repeat for the second dowel.


That's it! It takes a little guess work and about 20 minutes to make. Then you have your own custom paper towel holder.

What do you think? Would you rather just buy something like this and be done with it or do you enjoy knowing you created it yourself? I'd love to know!

Sheila

P.S. my camera cord is currently M.I.A so all the pictures had to be taken on my phone. That's why they are even worse than usual. Growing pains!

Monday, July 8, 2013

Dashboard Bean Bag

Did you have fun this weekend? I sure did! I went on a road trip to go camping with my roommate and her family. I thought we were headed to West Virginia, but we actually went to Virginia. Good thing we had a GPS with us.

I used to keep my GPS attached to the windshield with the suction cup but it would randomly fall off occasionally, scaring me half to death, and sometimes even falling off the dash completely at the worst times. It came with a piece to attach to the dashboard but I didn't like that it would be stuck permanently. After a while of searching for an alternative, I came up with this easy little bean bag.

(More after the jump!)

Tuesday, July 2, 2013

Firework Poppers!

Fireworks are dangerous y'all. 

They are loud. They involve fire... Maybe that's a part of their appeal to the masses. For others, the noise and the danger are unsettling and intrusive. Even illegal. So I came up with something else!

You will need:


Colored rice (food coloring, vinegar, white rice)
2 sheets of paper cut in half, hotdog style
4 toilet paper rolls
markers
tape
4 medium-sized balloons

*Makes 4 poppers.
*This project was originally intended for kids but my test audience (fellow 20-something) and I found them highly entertaining.
*I researched to make sure the rice/food coloring combo wasn't bad for birds. As far as I could find, they'll be fine.

Start with dying the rice. Use 2 tbsp of vinegar with 2 drops of food coloring to 3/4-1/2 c of white rice. Stir it all together and let sit for 5 minutes.


Spread the rice on foil to let it dry. I left it overnight, but I think it was ready in a few hours.


Use the markers to decorate one side of cut paper. Roll the paper around the tube and tape it shut.


Tie the end of the balloon and cut off the very top. Place it around one end of the tube.


Are you ready for the fun part? Take a small handful of rice and put into the open end of the tube. Pull back on the knotted end of the balloon slightly and FIRE! 

See all the rice in the air? It worked way better than I expected. But don't aim these towards your face. We didn't try it but I have a feeling it wouldn't go well.

We even took a video because we weren't sure a photo fully captured the effect. Unfortunately, I'm apparently the world's worst videographer and there's a lot of camera shaking and laughing involved.

Do you love real fireworks or hate them? Would you make these with your kids or for yourself? I'd love to know!

Sheila :) 

Wednesday, May 29, 2013

Necessities for the Beginner Craft Kit

There are many different types of crafts: paper crafts, sewing, crocheting or knitting, painting, scrapbooking, jewelry making, sculpting... the list goes on and on. Some people have one interest and they stick with it. Some people are great at all of it. Some, like me, try all of it, learn just enough to get by, and then try to remember whatever skill is needed to birth the crafty love child of your imagination and creativity. Too vivid? Sorry. 

Craft stores are overwhelming. I've heard from many friends throughout the years that they would love to work on more projects but don't want to buy a bunch of expensive craft stuff if they don't end up liking it. Or they don't know where to start. Or they might not even know what some things are. That's okay. All you need to craft is an idea and a little time.

Over years of accumulated craft supplies I've learned a thing or two about what is worth a bigger investment and what are absolute basics that are used in almost every project. In hopes of removing some of the intimidation that comes with beginning to craft, I created this short list of what should go in a beginner's crafting kit. Mind you, this is based on what I use most, so if it doesn't reflect everything... then I'm sorry I failed you.


Some tips to help you get the most from your beginner kit:


These items won't be used in every project, and may not be enough to complete every endeavor, but they're a good start. Most of these things are used for general crafting. Specialized projects require specific tools.

So next time you find yourself in a craft store, you walk through those aisles like a boss.

Did I forget anything? Is there a particular tool or supplies you use all the time or something you'd like to learn how to use? I'd love to know.

Sheila :)

P.S. This is my first time trying to use graphics for parts of a written post. Does it work? I'm not sure I like it.

Tuesday, May 28, 2013

Notebook Pen Holder

Now that Memorial Day weekend is over and I'm back in South Carolina, it's time to get back to business. How about a little something to help stay organized?

Have you seen Smash Books by K&Company? I think they're adorable. They're not paying me to say this, I just really like the stuff. Such a simple, but great idea that anyone can do. I've used a composition book like this for years. The accessories with the line are clever with a touch of whimsy. You've already seen the label maker in use with cereal box file folders. I fell in love with the elastic pen holder for the binders. It keeps the binder closed so nothing falls out and holds pens and pencils at the same time.

After multiple trips noticing these pen holders in the craft store, it seemed like it would be easy enough to make one customized for my little blog notebook. I would have bought the holder, but it would be way too big.


Isn't it cute? A good friend gave it to me years ago and I've saved it until there was a use cool enough to deserve it. Now, it holds bunches of post ideas and inspirations.

You will need:
Elastic, I used 1-1/4" thick. The length needed will depend on your notebook.
2" wide fabric strip at least 7" long
sewing machine, or needle, thread and perseverance

Start by wrapping your elastic around the notebook. It should stretch just a bit to overlap about a half inch, but not tightly. (If you bring your notebook to the store, you could pay just for the elastic you need. I don't think that far ahead.) Mark it and cut it to size.

Run a stitch across the overlap to make a circle of the elastic. 

Set the elastic circle aside and cut your 2" fabric strip. The length will depend on on your preference; 7" worked for this small notebook


Pin and sew a rough hem on the long ends of the strip. I was going for a lose, messy style so I didn't worry too much about the lines. Annnnnnddddd I never sew straight lines anyway.


Sew the short end of the strip over the top of the stitch that connected the elastic ends into a circle.


The best way to judge how far apart to sew the pen spaces is to use pens, oddly enough.


After a few pen spaces, I got the idea to include the second most frequently used item in the notebook: post-its. Each line was stitched twice, forwards and backwards, for stability.


I love it. It's so useful and fun, if I do say so myself. It took about 30 minutes using a sewing machine.


Do you have a "smash book"? Official or homemade. Would you want to include anything else besides pens and post-its in this holder? I'd love to know.

Sheila :)


Related Posts Plugin for WordPress, Blogger...