Showing posts with label jar. Show all posts

Friday, May 10, 2013

Homemade Fruit Bouquet

It's time to get down to serious Mother's day business. This year my Mom actually made a request, which is unusual for her: a mixed CD and a scarf. Isn't it funny how something so simple can be so appreciated? I love making playlists for family members with songs connected to special memories or meaningful words. This has always been the song Mom and I share. How could one refuse this simple request? But also, how could one not add a little something extra? ;) 


I love giving things that are useful, and don't have to be stored long term. I also try to avoid loading people with sugar as a gift: Thanks for being awesome Mom. Please accept this gift of high blood pressure and an unhealthy dose of bad cholesterol. Love you! Yeah, not so much. But there is an alternative! A fruit bouquet is the perfect blend of all things healthy, useful, and beautiful. It can be expensive to buy one pre-made, but not expensive at all to make yourself. Plus, it's great semi-last minute idea. Not that anyone ever does that...

PS. I made a (questionable) photo back drop! ^^ Look at that effort.

The secret is:


A metal cookie cutter. This one was 99 cents at Joann's. 

Besides the fruit and the cookie cutter, you'll also need:
  • bamboo skewers (I liked the natural look, but soak them in water with a little green food coloring if you want them to look more like stems)
  • medium sized jar (A cleaned Starbucks frappuccino bottle worked perfectly) 
  • a little ribbon or rafia (to make it fancy)
  • melon baller (or small paring knife and mad sculpting skills)


The fresh fruit recommended for this simple arrangement:
  • whole pineapple
  • strawberries 
  • green grapes
  • cantaloupe
The first and hardest step is preparing the pineapple.


Cut off the top of your pineapple but don't throw it away just yet. Flip the rest of the pineapple upside-down on the flat, cut side. Carefully remove the rind in segments saving the bottom section to cut off last. You don't need to worry about removing the center. Slice your pineapple into sections anywhere from 1/2" to 3/4" thick. Use your secret weapon (cookie cutter) to push into the slices and create the flower shapes. Push a bamboo skewer through the tough center at a slight angle until it pokes through about 1/2".  You can add a little variety by cutting the skewers to different lengths and arranging the other fruit around them. Add the fruit to the jar as it's prepared so you can tell how much more you're going to need. Four pineapple flowers was perfect for a jar this size.


Next, put grapes and strawberries on skewers. Couldn't be easier. This jar held  4 grape skewers and 3 strawberry skewers.


Cut the cantaloupe using the larger side of a melon baller to create the center of the flowers. It works best if one side is flat. Use the tiny bit of skewer poking through the top center of the pineapple flowers to keep the cantaloupe in place.

Now it's time to get fancy.


Arrange your flowers how you like them. I'm not particularly good at this, so I'm sure your's will look a lot cuter. After you're satisfied with the arrangement, carefully pull out the longest leaves from the top of the pineapple. Slide one leaf at a time inside the jar, staying outside of the skewers until they are all the way around the inside, which took about 6 or 7 leaves. Add a ribbon or rafia bow and you're finished!
A different challenge in making your own fruit arrangement verses buying it is wrapping it up. If possible, just put it in the fridge how it is to keep until you present it. If you need to cover it up for any reason, it's easy enough to use a plastic grocery bag carefully tied around the top and remove it before gifting. Or go all out and get a cellophane bag with some extra rafia.


Do you have a special song with your Mom? What other fruit would you want to incorporate? I'd love to know.

Sheila :)

Wednesday, May 1, 2013

Newlywed Date Jar Gift

This past weekend, I roadtripped up 11 hours to New Jersey for the wedding of one of my closest friends. I had never seen this part of the country before so it was quite the experience. New cities and old friends, I can think of few better combinations!

Have you been to a campground wedding? It was so much more affordable to stay at then a hotel and stinkin' adorable. I mean, just look at this:


I can't even handle it. So of course a pair of lovebirds this unique and wonderful deserved much better than a mundane wedding gift like a blender. Or whatever people buy as normal wedding gifts these days.

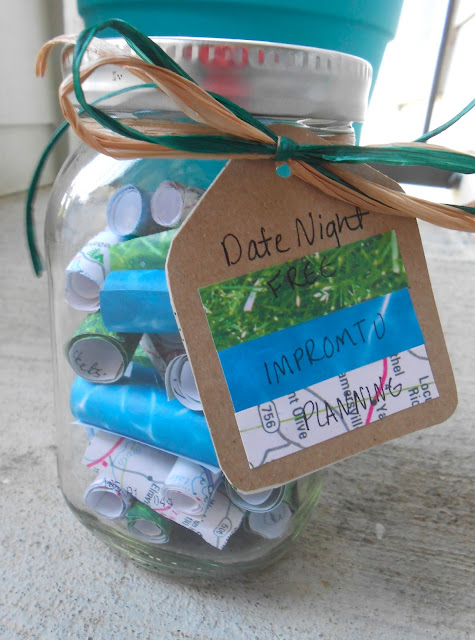
Behold: The Newlywed Date Jar!

I had so much fun making this that I could barely wait to share it. But I had to. Or the surprise would have been ruined. Will power was involved. The most time consuming part of making this gift is coming up with date ideas you think the couple would enjoy. I'll give you a few different websites that I used for inspiration later on. (Stevie or Scott, if you're reading this, it took a million years, cost a bajillion dollars, and every single date was crafted from my own brain...)

Step 1: Make a mess of a work space before you even accomplish anything. Preferably somewhere on the floor. If you're lazy and prefer not to get up multiple times, gather 3 different pieces of coordinating  but different scrapbook paper, scissors or a paper cutter, a pen, and a source of creative date inspiration (computer). 


Step 2: Eat pickles. A whole jar of them. Or find another jar that's already empty. I happened to like pickles and this jar so it was a win-win. Also wash the jar, well. I washed this one multiple times and even soaked it but the pickle smell still lingered a bit.

Step 3: Cut your scrapbook paper into even size strips. It was easiest to cut a 12" x 12" sheet in half, and then cut down in 2" strips. It should give you 12 strips measuring 6" x 2" from each sheet. The three different papers separate different types of dates. In this example, the grass paper was free dates, the water paper was impromptu dates (like a regular Friday or Saturday night), and the map paper was dates that take more planning and effort. Check the back of the paper and set aside any strips that have a scanner code or any other printing you may not want to include.


Step 4: Once you have all your paper cut, it's time to look for date ideas! If you are fancy enough to have a printer, you might have wanted to do this step first and print them out on the scrapbook paper before cutting. But I'm partial to the charm and personality that handwriting brings. It was fun to give each date a title and then explain it a bit. I hope you have as much fun thinking of personalized things as I did. This post, Date Night Jar, from Life in the Green House was a part of the initial inspiration for this idea (Thank you, thank you!), especially the idea of categorizing date types.
These sites were also super helpful in coming up with date plans: 


Step 5: Once you finish writing out your ideas, roll the strips up tightly like a scroll. Originally, each one was going to have a piece of cord around it but they stayed so well on their own, I left it off. Pile them randomly into the jar.

Step 6: Decorate your jar! This paper was already busy and bright, so it looked best paired with a simple rafia bow. The tag is actually the inside of a cereal box cut to shape. Waste not, want not. I used small of the scrapbook paper with the scanner bar on the other side to create a key, labeling appropriately as Free, Impromptu, and Planning. Also, I added a note to the back of the tag after these pictures were taken that said "PS. Sorry I smell like pickles." 'Cause it really does. 
Any unused papers might be a nice touch to include so they can contribute their own ideas. Most importantly, give your support and remind your friends that you can't wait to help them along in their next chapter of life.


I wanted to do something extra special for such a dear friend so I also gave them a partially completed wedding scrapbook with the welcome and invitation pages finished and a note saying "The rest hasn't happened yet." It's back in SC now and will be tackled once the professional pictures are all available.  Maybe I'll update on that later on...

If you make one of these jars, I'd love to see how you make it your own!

Sheila :)

PS. Haven't settled on an instructional style as you can probably tell. Any suggestions on this are also appreciated.


Related Posts Plugin for WordPress, Blogger...