Showing posts with label gift. Show all posts

Wednesday, December 11, 2013

Simple Glass Ornaments

WHAT. HAPPENED. TO. DECEMBER. 

Seriously, how is it already the 11th? I feel like Thanksgiving tricked me this year by being so late. Oops. If you're like me and feeling desperately behind, I have an easy project suggestion that would be great as a stocking stuffer or simple, elegant gift.


It's pretty simple, especially if you're comfortable with free-handed drawing. All it takes is plain glass ornaments, puffy paint, ribbons, candy and a dry erase marker if you want to sketch out your drawings before using the puffy paint.

 We wanted each one to be unique so we used about 16 different Christmas images: star, a strand of lights, a fire place, stockings, Santa hat, silver bells, candy cane, gingerbread man, ornaments, Christmas tree,  wreath, snow man, snowflakes, holly, and then a few logos of the organizations receiving gifts.


After the paint dried overnight, we filled them with M&Ms and put a ribbon on top to finish them. We then realized the candy made them VERY heavy and also easier to break. Instead, we used the candy as a layer of protection around the ornaments when we put them in the gift bags. Functional and tasty, 2 things I love. 


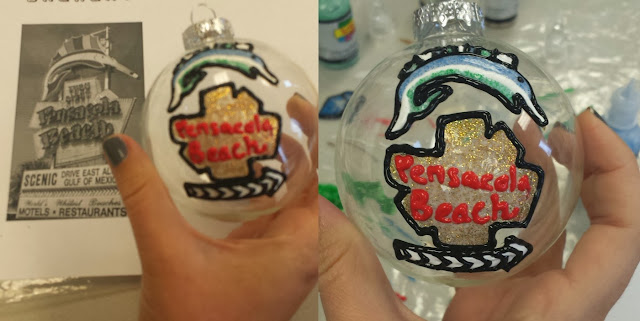
The dry erase marker is particularly helpful for detailed projects, like this Pensacola Beach sign. If you use the dry erase maker then just use a dry paint brush to wipe off any extra after the paint dries. It's kind of fun to do. I would find myself using the marker even when I didn't need an outline just because I enjoyed brushing it off later... Is that weird? Don't judge me.

Pretty simple, but fun to make and seemed to be very well received by the people they were given to (it was actually a work project, I wish I had this many gifts finished for friends!).

So you have any handmade ornaments on your tree? Have you spent a lot of time mastering the beast that is puffy paint? I'd love to know!

Sheila


Friday, June 14, 2013

Weekend Inspiration: Father's Day

Sunday is Father's Day already. It seems like Mother's Day was just last weekend. I'm expecting it to be pretty quiet around here with a long phone call home on Sunday. This Weekend Inspiration is full of fun ideas to make the father figure in your life feel extra special.


3 free printable cards from the House that Lars Built.


It's a beer holster. Perfect! On fab.com.

mld103351_0608_cube.jpg
A personalized Father's Day notepad from Martha Stewart.


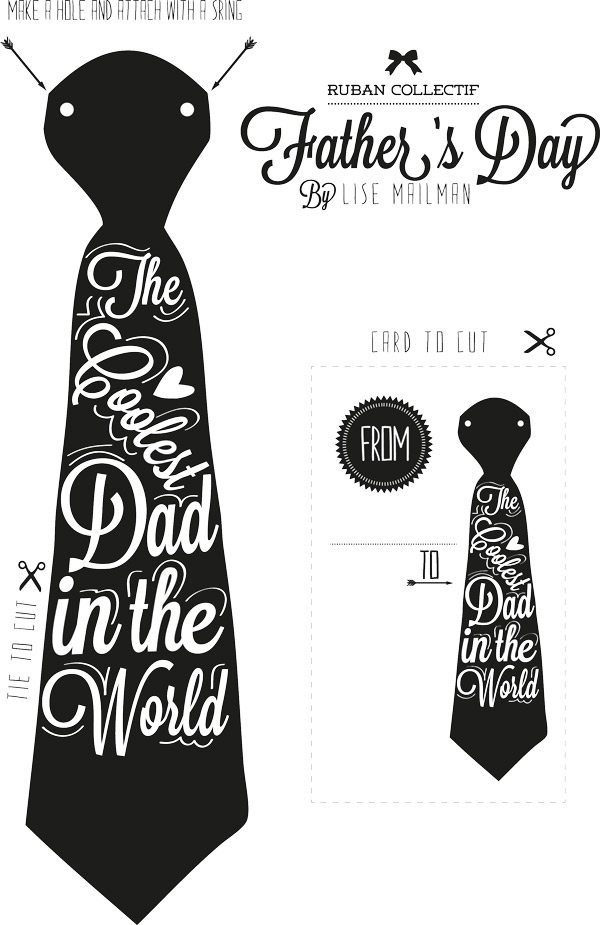
A printable, wearable Father's Day card on the Sweetest Occasion.

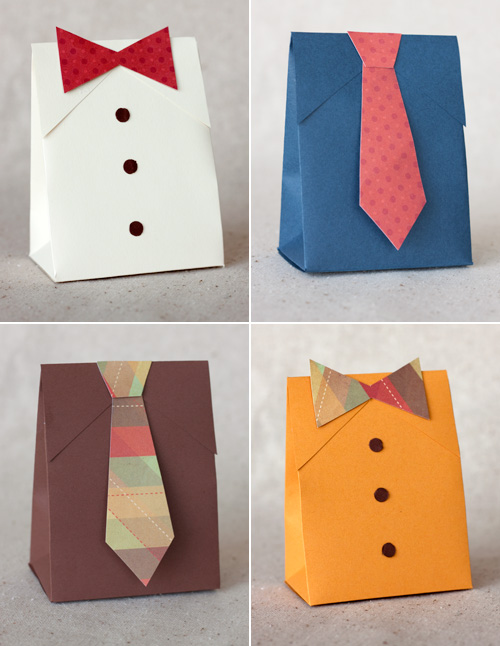
DIY Father's Day Shirt & Tie Gift Boxes

Or how about these dashing gift bags on Paper Crave?


I LOVE this personalized fishing lure on Etsy!

ff_hovercraft_f

Oh this? This is just a HOMEMADE HOVER CRAFT. Could you possibly make a cooler present? Adam Savage from MythBusters gives directions on how to make it here.

Brazilian Grilled Flank Steak Recipe

For a special treat, this Brazilian Grilled Flank Steak from EatingWell looks delicious.


I have to include my Dad's recipe for Steak Shish Kabobs. It's clearly a Dad favorite.

Just a few gifts, recipes, and cards to make your Dad feel extra loved this Father's Day. I guess I better get my package in the mail...

Hope you have a great weekend! What do you have planned to celebrate the Father in your life? I'd love to know.

Sheila :)


Wednesday, June 12, 2013

Happy (almost) Father's Day!

Don't read this before Father's Day Dad!

My Dad has kept everything I've ever made him. Everything.


The garage is kind of a time capsule of my creative development. I once gave him a popsicle stick that I tried to decorate to look like him. I used a pom pom to give it a little belly. I also sewed a little pouch so he could hang it on his peg board. I once gave him a paper plate decorated with bits of a plastic cup, cut into a smiley face. He keeps it all. And he likes it. I think.

As I've grown up (somewhat) I've tried to give slightly more useful gifts with a homemade flair. The man can never find any utensils in the kitchen; one year I bought a set of bbq tools and decorated them with bright red foam cuffs so that he would be able to find them. Guess where they are now? Hanging up in the garage.


Recently, Mom and Dad have been making the effort to eat healthier. That's meant a few pretty big changes around the Mettetal house. Among other things, a major effort has gone to reducing sodium. For Father's Day this year, I rounded up a few healthy, lower sodium snacks for Dad to munch on while watching his beloved races in his comfy chair in the garage.


I chose wasabi peas 'cause he loves him some spice, pistachios, and his favorite mixed nuts from the Make Your Own Trail Mix bar at Whole Foods. I used all unsalted nuts accept for almonds, then I tossed them all together to spread out the seasoning.

I can't just send a box of random snacks. That's not exciting at all. But etched father's day snack jars to go with them? Perfect. You know, to keep in the garage.

You will need:

3 extra clean and dry jars with lids
glass etch cream, like Armour Etch
foam spouncer
alphabet stickers
masking tap
duct tape

*Pay no attention to the paint, brush, and sandpaper in this picture. I had an idea for the lids that failed miserably. Duct tape really does fix everything.
*There are stencils and tools made just for glass etching but they tend to be a little expensive. The sticker/tape method is effective and cheap. Contact paper works well too.

 Use masking tap to section a rectangle on your jar. Use the alphabet stickers to spell out your chosen words. I picked "Father," "Dad," and "Pop" in three different fonts. Press down all stickers and tape as firmly as possible to seal the edges.


Use the spouncer to apply a generous coat of etch cream. A paint brush would work as well but the back and forth motion is more likely to accidentally lift the stickers or tape. Use the etch cream according to product instructions. The great thing about etching is it won't wear off or fade like paint. It's on there for keeps! It is essentially an acid that slightly corrodes the glass. It can burn you if you're not careful. Not that I know from experience or anything... 


Leave the cream on for at least 5 minutes, then gently wash off with soap and water. Once the cream is off it's time to remove the stickers and tape. 

Cover your lids with duct tape. It stays the best if wrapped around the edges and taped to the top inside of the lid. Don't worry, the jar still closes securely this way. Add your snacks to the jars and you're set!

 The drastic difference in jar size makes them more fun to look at but a lot harder to get a good picture!


Do you have anything planned for Father's Day? What snacks would you include in your jars? I'd love to know!

Sheila :) 
Tuesday, June 4, 2013

"The Only Universal Language" Fabric World Map

My roommate is a master's student in conducting. I used to think of myself as a relatively knowledgeable musician. I was lying to myself. Anyway, today is her Birthday.


I had to surprise her. She went all out for my birthday in March. Last night I decorated her bedroom door and made her a chocolate layer cake with oreo cream cheese icing. And a little artwork. Fancy making you're own?


You will need:

- large world map print out, used here 4 landscape letter sized sheets taped together
- corrugated cardboard large enough for map
- 1/4 yard of fabric
- paint, used here are primary blue and black
- push pins
- Mod Podge and foam brush
- scissors
- black marker
- craft paper
- 4 eyelets and mounting tool (like Crop-a-dile)

After you've printed your map and taped the seams together, trim any extra paper from the edges. Carefully rip cardboard down to the size and shape desired to accommodate map. Varying the amount of corrugated board showing through adds texture.


Paint your board. I used a mix of primary blue with a drop of black. 

 Cut out large outlines of your map and mark your spacing.

 This is where it gets a little more complicated. Pin your paper map pieces to your fabric. I wanted the fabric to fray but trying to cut it was way to tricky. It was much easier after coating the back with a thin coat of Mod Podge and letting it dry. I didn't even have to take the pins out to do this. It gives the fabric just enough stability to be easier to cut, but unfortunately for this situation also keeps it from fraying easily.


The more details you cut, the harder it will be to get them all in the right place! Some smaller or closer islands are grouped together and cut out as one piece to preserve my sanity. This map is questionably geographically accurate... I double-checked. Remove the pins and paper templates and use Mod Podge on the back of the fabric to glue the sections on to the cardboard. Usually, I would recommend going over the top of the whole project with Mod Podge as well, but I didn't want the shiny finish and am secretly hoping the fabric will magically distress itself over time.

 The roommate loves to travel so I was hoping to combine the two loves of travel and music.

 But I hated how it looked so I re-did it using a few pieces of craft paper layered to cover the original writing and 4 gold eyelets to mount them.


It didn't turn out exactly how I had in mind. It had a life of it's own. Cutting out something in such varied shapes using a fabric with straight lines in the pattern was much harder than anticipated. Also, if I started over from the beginning I would probably soak the fabric in a tea bath first to tone down the bright whiteness of it. Overall, I'm still happy with it and Amanda likes it, so that's all I care about!

Have you ever had a project you'd like to adjust after you've already finished? Would you cut out all those tiny islands!? I'd love to know!

Sheila :)

Monday, June 3, 2013

Crochet Newborn Owl Hat

Hope you had a nice weekend. It was pretty quiet here, just the way I like. I had time to make this little newborn hat for a friend: 


I did not create this pattern, but you can find it and make your own on Projects Around the House.

I'm not great at following patterns. Usually, when I crochet it's just made up on the fly. The fact that this one turned out fairly close to what the original looks like says a lot about the clarity of her instructions. Also, the idea of using a jar to show a baby hat is brilliant. Thanks Christine!

The only thing the pattern leaves out are the things you need to make a truly great Saturday morning...


My friend let me borrow the first season of New Girl. I hadn't seen it before which seemed to surprise everyone. According to them, Jess (the Zooey Deshanel character) and I are the same person.I'm not sure sure about that but some of the similarities were a little weird. We even have the exact same set of fake hillbilly teeth...

Soon I'll be working on a series of crochet basics for lefties. It's surprisingly hard to find that stuff. I've looked. Do you crochet? Are you a pattern user or a do you make it up yourself? I'd love to know.

Sheila :)

Tuesday, May 14, 2013

Antiqued Tile Coasters

My supervisor at work recently got married. She is always so great that I really wanted to make her something special. She didn't expect a gift but making and giving surprise gifts is pretty high on the list of things I love. But there were a few challenges: 1. I'm literally in poverty (VISTA life), 2. Although we work together on a daily basis, I don't really know her tastes or style preferences besides from normal office stuff. And office stuff is not wedding-y. With these things in mind, I set out to find something inexpensive, not overly personal, but still special. Maybe you've run into this situation before? Or am I the only one who forces my appreciation/gifts on other people...


You will need:

  • 4- 4"x4" tile pieces, these were were 16 cents a piece! Inexpensive = check.
  • 4 chosen images on regular printer paper  
  • flat cork. or felt. or slider dots... I just happened to have a roll of cork on hand
  • strong coffee
  • cotton balls
  • Mod Podge
  • foam brush
  • hot glue gun, if you're using the cork
  • ruler

First and foremost, pick out the images you would like to use. Ideally, they would have a 4"x 4" focal area.  The pictures for this project came from this interesting book my supervisor loaned to me. It seemed like a safe bet that she would like it, since it's her book. I made black and white copies of the 4 chosen pages. *That might be illegal... Hope not...


Next, brew extra strong coffee; I used leftover coffee to brew more coffee but you won't need more 1/2 cup. Use a cotton ball to apply the coffee to the paper, concentrating on the desired area and a few inches around. Even with strong coffee it still took 3 coats to get a nice sepia tone. Try not to move it until it dries or it could tear easily. Each coat will take at least 20 minutes to dry. I stole the roomie's seed babies to use as paper weights while they dried. Because I was too lazy to go back inside. Here's something to entertain you while you wait.

The neat thing about using multiple coats of dark coffee as opposed to just soaking it or some other methods is that it adds a lot of variance in shade. Each coat pools a little differently and adds a certain legitimacy to the antiqued appearance. It's not just one tone of sepia. It's my favorite way to antique paper.


Once your papers have reached your desired shade of sepia and dried, it's time to prepare them for the tiles. Center your tile over the image and mark the corners. Make a line about an inch long at a diagonal away from the corner (top left). Use a ruler to draw those inch long diagonal lines together (bottom left). Cut out around your pencil lines (bottom right). Wrap your image around the tile and make creases at the edges. The idea in wrapping the tile is to avoid visible unfinished tile sides so often seen in coaster tile projects. The paper should cover the sides and sit just a little ways onto the back side of the tile (top center). Once the creases are made, lightly coat the top of the tile with Mod Podge (top right) and slowly lay the paper on it, being sure to match up the corners. Carefully smooth the top of your paper watching for bubbles or lines,  then apply a thin coat to each area of the paper hanging over the tile and wrap it as your previously made creases indicate.


I ran into a little trouble with this coaster because I was trying to take pictures and be speedy. It didn't work out so well. But your edges will be cleaner and the tops will be flat I'm sure! The rest turned out much better once I put the camera away.


To prepare the cork, measure out and cut four 4" x 4" squares. Hot glue the edges and an X across the diagonals of the cork and quickly apply it to the back of tile pressing firmly and carefully wiping away any glue webs.


Now Mod Podge it up. Seal in that vintage-toned goodness on the top and sides with a thick coat of Mod Podge to protect it from the future drink elements it will encounter. Even with a foam brush Mod Podge leaves streaks. But you can use those to your advantage to make a linen texture look: for the first coat, keep all brush strokes going up and down, for the next all side to side.


In these pictures the tile looks a little more gray than sepia. But trust me, that's the fault of the photographer and not the method. This stinkin' photographer messes everything up. I should fire me.


Tile coasters are a crazy popular project because they're easy and adorable. Have you ever made any before? How were they different from these? I'd love to know!

Sheila :)

Friday, May 10, 2013

Homemade Fruit Bouquet

It's time to get down to serious Mother's day business. This year my Mom actually made a request, which is unusual for her: a mixed CD and a scarf. Isn't it funny how something so simple can be so appreciated? I love making playlists for family members with songs connected to special memories or meaningful words. This has always been the song Mom and I share. How could one refuse this simple request? But also, how could one not add a little something extra? ;) 


I love giving things that are useful, and don't have to be stored long term. I also try to avoid loading people with sugar as a gift: Thanks for being awesome Mom. Please accept this gift of high blood pressure and an unhealthy dose of bad cholesterol. Love you! Yeah, not so much. But there is an alternative! A fruit bouquet is the perfect blend of all things healthy, useful, and beautiful. It can be expensive to buy one pre-made, but not expensive at all to make yourself. Plus, it's great semi-last minute idea. Not that anyone ever does that...

PS. I made a (questionable) photo back drop! ^^ Look at that effort.

The secret is:


A metal cookie cutter. This one was 99 cents at Joann's. 

Besides the fruit and the cookie cutter, you'll also need:
  • bamboo skewers (I liked the natural look, but soak them in water with a little green food coloring if you want them to look more like stems)
  • medium sized jar (A cleaned Starbucks frappuccino bottle worked perfectly) 
  • a little ribbon or rafia (to make it fancy)
  • melon baller (or small paring knife and mad sculpting skills)


The fresh fruit recommended for this simple arrangement:
  • whole pineapple
  • strawberries 
  • green grapes
  • cantaloupe
The first and hardest step is preparing the pineapple.


Cut off the top of your pineapple but don't throw it away just yet. Flip the rest of the pineapple upside-down on the flat, cut side. Carefully remove the rind in segments saving the bottom section to cut off last. You don't need to worry about removing the center. Slice your pineapple into sections anywhere from 1/2" to 3/4" thick. Use your secret weapon (cookie cutter) to push into the slices and create the flower shapes. Push a bamboo skewer through the tough center at a slight angle until it pokes through about 1/2".  You can add a little variety by cutting the skewers to different lengths and arranging the other fruit around them. Add the fruit to the jar as it's prepared so you can tell how much more you're going to need. Four pineapple flowers was perfect for a jar this size.


Next, put grapes and strawberries on skewers. Couldn't be easier. This jar held  4 grape skewers and 3 strawberry skewers.


Cut the cantaloupe using the larger side of a melon baller to create the center of the flowers. It works best if one side is flat. Use the tiny bit of skewer poking through the top center of the pineapple flowers to keep the cantaloupe in place.

Now it's time to get fancy.


Arrange your flowers how you like them. I'm not particularly good at this, so I'm sure your's will look a lot cuter. After you're satisfied with the arrangement, carefully pull out the longest leaves from the top of the pineapple. Slide one leaf at a time inside the jar, staying outside of the skewers until they are all the way around the inside, which took about 6 or 7 leaves. Add a ribbon or rafia bow and you're finished!
A different challenge in making your own fruit arrangement verses buying it is wrapping it up. If possible, just put it in the fridge how it is to keep until you present it. If you need to cover it up for any reason, it's easy enough to use a plastic grocery bag carefully tied around the top and remove it before gifting. Or go all out and get a cellophane bag with some extra rafia.


Do you have a special song with your Mom? What other fruit would you want to incorporate? I'd love to know.

Sheila :)
Related Posts Plugin for WordPress, Blogger...