Showing posts with label eatin'. Show all posts

Tuesday, July 14, 2020

Whole 30 Week 1: HOLY COW (Experience and Meal Ideas)


OOPS I live in Georgia now. If you remember from my casual 5 year catch up post, I mentioned we were preparing to leave Wisconsin and somehow it’s already happened! I mean, I wish it was that easy to have moved across the country during a global pandemic, but no one cares to hear about a stressful move. The end result is that we’re here and getting acclimated to our new sunny southern space! 


After packing for weeks and eating largely junk food and takeout during the whole process, Husband and I decided to try the Whole30 meal program for a food reset to get us back on track. If you haven’t heard of it before, it’s basically an elimination diet where, for 30 days, you refrain from eating food types that tend to cause negative impacts for people, including dairy, grains, legumes, soy, sugar, and alcohol. During the 30 days, you’re not supposed to weigh yourself or count calories. The point is to listen to the way your body responds to the food and develop trust for your hunger signals. This is a very brief summary but there's lots of research and resources available if you’re interested in undertaking the 30 days. After the 30 days, you slowly start adding back in the eliminated food groups to pay attention to how it makes you feel to decide if you want to continue eating it.


As you can probably imagine, it takes a LOT of planning to make Whole30 compliant meals. On top of that, Husband is super duper picky, especially about vegetables. It’s fine. I’m fine. But it is doable! Knowing how much time and energy it’s taken to create meal plans for us, I thought it might be helpful to share what’s worked for our first week:


A few tips and tools:

  1. Google Sheets is your best friend in this effort. It’s been the most helpful tool to create meal plans, shopping lists, and prep plans.

  2. Use weekly ads and specials to inspire your meal plans. Don’t be like me and go straight to Pinterest, find a bunch of delicious looking recipes, realize it would double your grocery bill, and then start over with a sales first mentality. Whole30 ends up incorporating a lot of protein since grains and legumes are out and that can get expensive quickly. 

    1. I also tried to find recipes that used the same ingredients in multiple different ways to save a little more buying larger quantities.

  3. If possible, move your non-compliant foods to a less visible area of your pantry/fridge/counter. It’ll feel less restrictive if you don’t have to remind yourself what you “can’t have.”


Now to the fun part, the food:


I prepped 3 to 4 meals at a time so having two options to switch during the week kept things interesting. Recipes are linked, although I didn't always use one, or the linked recipe was an inspiration.


And a shopping list:


See anything you might make? What was your experience if you’ve done Whole30 before? I’d love to know!

Sheila

Wednesday, September 25, 2013

Small Batch Apple Butter

On a scale from "I could explode" to "I'm a robot and have no feelings," how excited are you for Fall to be here?


I'm pretty darn excited, but I'm not quite ready to jump on the pumpkinize everything bandwagon. That will come soon I'm sure. In the mean time, this small batch of apple butter was just the taste of Fall I was looking for. Since I live alone and don't know many people in the area, I didn't want to make a whole ton. Plus I mostly just wanted to use up a few apples that were getting past their prime. Ready to make your own? (I adapted this recipe from Sweet Style CA)


You Will Need:

-5 small/medium apples, I used Gala
-3/4 cup brown sugar
-2 tbsp cinnamon
-1/4 tsp cloves
-1/4 tsp nutmeg
-1/4 tsp grated ginger
-a little lemon juice, if you're fancy


Put sauce pot on low heat while you are peeling and chopping the apples into small chunks. Add the apples to your pot as you chop them and stir occasionally as you go. I found it helpful to keep the lid on the pot when I wasn't adding apples so they steam could help tenderize.


After all the apples are added, stir well and add brown sugar and spices. Let simmer on low for about 15 minutes while you try to figure out how to work the immersion (stick) blender. Or real blender. Or potato masher. Whatever you've got.

Once the apples where good and soft, which is easy to tell if you taste one, pour the contents of the pot into a bowl or blender and mix until a smooth texture is reached. This is the first time I've used my immersion blender and it's a pretty stinkin' awesome little gadget, if you're thinking about getting one.


Next, put the apples back in the pot for just a few more minutes (about 10) on low heat with the lid off this time to help it thicken up. I forgot to add any lemon juice to mine like the original recipe calls for and so far it hasn't been a problem. I have a feeling that's meant as a preservative though so it might a good idea to put in a squeeze or two from a lemon and add more cinnamon to cover the taste.


It's all ready to slather on some toast and enjoy! Or just eat it from the jar. Let's be honest here.

Hope you enjoy this little taste of Fall. I have a feeling Greenville will be beautiful when all the leaves change colors so I'm excited to see it. What are you looking forward to most? Any traditions to help welcome the new season? I'd love to know!

Sheila


Thursday, July 18, 2013

Kale and Artichoke Stuffed Mushrooms.

Are you a mushroom lover, or a hater?


There doesn't seem to be a lot of middle ground on this. Mushrooms have been high on my lists of favorite foods since childhood. I was that weird kid who hated whipped cream and coconut, but give me a plate of mushrooms and/or olives and I'd be one happy camper. To this day I have a tendency to add mushrooms into everything I cook.

When a friend shared this recipe for a kale and artichoke spread, I instantly felt the need to add mushrooms. And cheese. Because all good things include cheese.

You will need:

3 cups kale
1/2 can of artichoke hearts, about 5
2 gloves of garlic, minced
1 tbsp olive oil
juice of half a lemon (about 1 tbsp)
a sprinkle of salt and pepper
8 oz of mushroom caps, I used Baby Bella 'cause that's my favorite
1/4 cup of shredded mozzarella cheese


Preheat your oven to 350 degrees, because you usually forget and have to wait on it later. Heat the olive oil in a frying pan over medium-low heat with the minced garlic. Chop your kale as finely as possible before cooking it in olive oil. I don't have a fancy food processor, so I just use a knife and patience and it works to a varying degree. As the kale is cooking down, finely chop the artichoke hearts and add them to the pan. Squeeze the half a lemon over top of the mixture and sprinkle salt and pepper. Cook together on medium-low heat for a few minutes stirring occasionally.

As you're keeping an eye on that, wash the mushrooms and remove the stems. You could chop the stems and cook with the kale mixture but I chose to use them for other purposes (i.e. I ate immediately). When I bought these 'shrooms I had no intention of making stuffed mushrooms so I wasn't concerned about the size. Some of these look like baby mushrooms next to their momma mushroom. I would recommend being a little choosier to find slightly larger mushrooms if you buy them to stuff. Spoon in the mixture and lightly pack it. Top with a tiny sprinkle of cheese and bake for 25-30 minutes. Or until you get impatient and decide you're hungry and just want to eat them.

We enjoyed them with a slice of sunflower bread and fresh green beans. Delicious!

Do you have a favorite food you add into everything? It is also mushrooms!? I'd love to know.

Sheila :)

P.S. Today is the last day to enter the giveaway if you're interested. I'll announce a winner tomorrow. Exciting!

Monday, July 1, 2013

Patriotic Nachos

Hope you had a great weekend! We decided to celebrate the 4th of July a little early with a picnic on Sunday. There are so many red, white, and blue recipes for the holiday. Most of them seem to be berry-centric, so a friend challenged me to come up with something else. Maybe something cheese-related?


This is probably the easiest 4th of July party idea ever. If you've got plans for next weekend and don't know what to bring, THIS is the way to go. I didn't do anything fancy to serve them since we were planning to transport them to the park with all the rest of the picnic stuff. You could go all out if you're so inclined.


It's just red salsa, queso blanco, and blue corn chips. Red, white, and blue. Patriotic nachos. Boom.

What are you looking forward most about the 4th? Any special traditions? I'd love to know.

Sheila

P.S. Normally you'd have to melt queso blanco but we were eating it outside in Summer in South Carolina. It stayed plenty melty.

P.S.S. We made quite the dent for just 2 small people.


Tuesday, June 25, 2013

Almond Butter Chocolate Chip Cookies

There are few things more delicious than cookies made for no reason at all. 

Last week, a friend from work asked if I could use up an almost full tub of almond butter in one weekend since the expiration date was that Monday. Um, challenge accepted. 

My favorite chocolate chip cookie recipe is one my Mom clipped out of a newspaper forever and a day ago.I have no idea what it's called or who actually came up with it. Sorry. The best part about it is that it calls for 1 cup of peanut butter. Having regular chocolate chip cookies with no peanut better tastes weird to me now. I've been spoiled! Substituting the peanut butter with almond butter seemed like a delicious alternative, and somehow made the cookies seem more grown up. To match the adult(ish) switch to almond butter, I decided to use dark chocolate instead of the usual semi-sweet (so basically they're healthy now) and toffee bits (shhh... just let me believe they're healthy). 

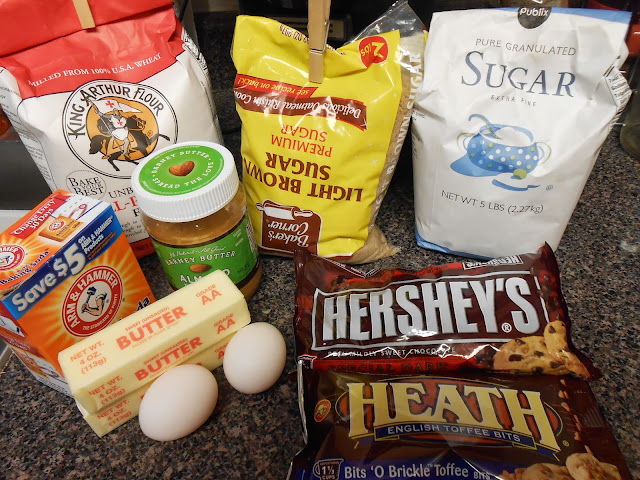
You will need:

1 cup granulated sugar
1 cup brown sugar
2 cups all purpose flour 
1 tsp baking soda
1 cup almond butter
2 eggs
1 cup soft butter 
2 cups mix-in of choice (used here are dark chocolate and toffee bits)

Preheat oven to 350. Cream together sugars, butter, and almond butter. Mix in eggs. Add combined flour and baking soda. 

Use a spoon to combine the mix-ins. It seemed like fun to experiment: the far left is just dark chocolate, the center is dark chocolate and toffee, the right is just toffee. Really, there was no way to loose.

Make fun of your friend a little for the large size of her cookie balls. Roll your own in 1 inch balls and place about 2 inches apart. Bake at 350 for 10-12 minutes. 14-15 minutes for those more enthusiastically sized.

Leave them on the sheet a few minutes to firm up. If you move them while they are too hot they will fall apart, which is part of what makes them so delicious. Put them on a wire rack or paper towels to finish cooling.

Eat too many, force your friend to take some home, then bring them to work the next day because you don't need a massive plate of delicious cookies all by yourself.


Is there anything different about your favorite chocolate chip cookie recipe? What other mix-ins would you want to try? I'd love to know.

Sheila

P.S. The one with both chocolate and toffee was my favorite, in case you're wondering. Although all 3 options were enjoyed.


Tuesday, June 18, 2013

Chocolate-Dipped Watermelon Cookies

Why stop at just a fruit bouquet when you can make fruit "cookies"?


How about chocolate dipped watermelon cookies? Whole Foods had watermelon on sale the other day so I picked one up. At the time I didn't have any specific plans for it. Later I remembered I needed a dessert this week...brain storming...mental pantry inventory... Does chocolate taste good with watermelon?...


Yes my friends, yes it does.


You will need:

Seedless Watermelon
Cookie Cutter
16 oz Chocolate Chips, I used dark chocolate and semi-sweet mixed
small chuck of paraffin wax, 1/8th of the bar would be almost too much
toppings such as coconut, sea salt, etc.

*I've heard that coconut oil is able to function in the same way as paraffin wax; it should help the chocolate to grab on to the fruit and become slightly hardened when cooled. I haven't tried it but I want to!

Start by heating up your chocolate so it has time to melt slowly. You can do this in a double boiler on over low-medium heat, or use a mini-crock pot with a warm setting. Keep an eye on your chocolate and stir occasionally throughout the following steps.


Slice your watermelon in pieces about as thick as your chosen cookie cutter. In this case, about 3/4".


Use the cookie cutter to create small cookie shapes from the slices quickly and easily. I used a flower cookies cutter. A smaller cookie cutter seemed like it would be easier to dip in the chocolate.


Honestly, the cookie cutter could be your only step and it would still be an adorable way to eat watermelon. But if you're in it for the chocolate long haul, mix the small piece of paraffin wax with the mostly melted chocolate. Stir until the piece is gone. You can use a serving fork to pick up each cookie and dip one flat side into the melted chocolate.


Place the dipped watermelon chocolate side up on a piece of wax paper and sprinkle on your chosen topping before the chocolate hardens. I used coconut and sea salt as topping choices, and left others undipped or just chocolate.


It was fun to alternate the finished products on a cookie sheet. The sea salt was definitely my favorite.


You don't need to refridgerate or freeze to harden the chocolate, but I would recommend refrigerating if you're waiting to serve them. Otherwise, just enjoy! Overhead lighting makes them look super shiny.


These weren't happy when they were outside for a while, but they regained their composure when taken out of the heat. If you make them for a cookout, I would keep them inside or refrigerated until it's time to serve rather than leaving them out on the table.

Have you ever had chocolate and watermelon before? What topping would you like to try? I'd love to know!

Sheila :)


Monday, June 10, 2013

Kale and Portobello Alfredo

Happy Monday! I hope everyone had a fantastic weekend, despite all the rain in some parts. Did you do anything exciting?

It's been a while since I posted a recipe but the other day...


I made a terrible choice.

I skipped lunch. I don't know what made me think that was a good choice...

I have emergency snacks on hand just about everywhere. In my purse, my desk, my car, even my nightstand.  But they’re just little snacks like granola bars or almonds. Anyone who has even been around me for more than a few hours knows that if I don’t eat, I become obsessed. And cranky. And whiny. And generally unpleasant. Knowing all of this about myself, it should have been clear that skipping lunch would be a poor choice.

This dish is the lazy/immediately hungry version of this delicious looking feast from Iowa Girl Eats, using my favorite simple alfredo sauce that I've been using so long I can't even remember where I learned it.

You will need:
8 oz pasta of your choosing, I wanted to use up some whole wheat gnocchi
6 cups chopped cooked kale
8 oz portobello mushrooms
1 tbsp olive oil
2 cloves of garlic
3/4 to 1 cup grated Parmesan Cheese
Up to 1 cup heavy cream
salt and pepper
parsley

Cook your pasta. Do a better job that I did.


Slice up the mushrooms and dice the garlic. If you’re using fresh kale, you’ll want chop it into small pieces after pulling it off from the large center stem.

Side note: Did you know you can freeze kale? One day I cooked too much and decided to see what would happen if I stuck the leftovers into a plastic bag in the freezer. When it was time for kale again, it was so easy to dump it out of the bag and into the skillet to reheat it in no time at all. It makes adding healthy touches so much easier, especially if you usually eat kale cooked rather than raw anyway.


Next it’s time to sauté. Heat your olive oil in a sauté pan over medium heat. If you’re using fresh kale, add that to the pan first with half of your diced garlic and let cook while stirring frequently for about five minutes. Add the rest of your garlic in with your mushroom slices and continue to stir occasionally. If you’re using frozen kale, you can throw it in after your mushrooms have had a few minutes to cook.


By now your pasta is probably finished and set aside to drain. Now it's time to whip up the sauce. Over low to medium heat, throw a heaping handful of grated parmesan into a sauce pot and let it heat up for a just a second. Slowly add in cream and whisk quickly and continuously until the desired consistency is reached. Sprinkle salt and pepper on top for the easiest, most delicious alfredo sauce ever.

I must confess that although I have used the above recipe multiple times in the past I did not use it for this particular dish. I used cheater alfredo. I was huuuunngrrryyyy. I regret nothing.


Once your mushrooms have cooked down, your kale is perfectly heated, and your alfredo sauce is ready, toss it all in a bowl and sprinkle some extra grated parmesan and parsley on top. You know, to make it fancy.


Then eat it like you meant it. And don’t forget to save the leftovers for lunch the next day ;)


Do you know of a better way to freeze kale? Have you ever used such an easy homemade alfredo? I’d love to know!

Sheila 

Monday, May 27, 2013

Dad's Steak Shish Kabobs

Happy Memorial Day friends! I hope it's wonderful so far. Full of lots of friends, celebration, thankfulness, and remembrance.

One of my favorite things about visiting home, aside from spending time with family and hopefully seeing from friends (which sadly didn't happen this time) is cooking together. The internet can teach you recipes, but family will teach you how to cook.


I'm pretty lucking in that both Mom and Dad are good cooks. My sister and I grew up on simple, healthy, and delicious meals that are still some of my favorites as an adult. A special treat frequently  requested for Birthdays and other occasions are these shish kabobs.

We made a ton of shish kabobs. For a normal dinner, you could use about half of the ingredients listed. This recipe made 15. The best thing about serving shish kabobs at a cookout is that you can prepare everything in advance and let everyone make their own according to preference. These instructions are to make them to Dad's tried and tested method.


You will need:

2-3 lbs Top sirloin steaks, trimmed and cubed to 1-1/2" pieces
Extra virgin olive oil, covered enough to coat but not to swim
McCormick Grillmates Montreal Seasoning, Dad has tried many and feels this is definitely the best
3 cubed peppers, green and red
2 large cubed Sweet Vidalia onions
2 lb Whole white mushrooms
1 pt Tomatoes, we used grape this time but Dad prefer's cherry


Marinade the meat with the olive oil and a healthy sprinkling of the Montreal seasoning. This is easiest to do in a dish with a tightly closing lid. Apparently the secret to a good marinade session is being able to shake it and evenly distribute the goods. Dad likes the Tupperware marinade set. Refrigerate in marinade at least 2 hours, flipping or shaking the container at least a few times throughout. Ideally, the marinade would sit a whole day, or even overnight. When you're done marinading don't throw out the leftover oil/seasoning, you're going to need it when grilling!


Lay out all of your cubed veggies and start adding to your skewers. According to both parents, the most important part of building a shish kabob is putting a green pepper in the bottom to keep the rest from moving around.


Dad recommends grilling with charcoal, as many grill aficionados will suggest. He let the coals heat up for a good 30-45 until they were nice and grey. (Dad just got a new grill. It is not for the faint of heart.)


Remember when I said to save the leftover marinade? Now is when we use that. Add a little extra olive oil and Montreal seasoning and brush the mixture over the assembled kabobs. You’ll do the same thing again while the kabobs are on the grill.  


Grill 'em up!


Tend constantly and turn frequently. Cook to desired doneness. Our family prefers medium rare which doesn't take quite as long.


Add some more marinade.


Admire the deliciousness.


Serve with rice and good company.

Well, it's time for me to hit the road back to South Carolina! What is your favorite family tradition meal? Are you a griller? I've never tried but have always wanted to. I'd love to know.

Sheila :)


Related Posts Plugin for WordPress, Blogger...